Friday, April 30, 2010

STRAWBERRIES & CREAM FAIRY CAKES


I always called these fairy cakes, but recently discovered that most people call them butterfly cakes. Either way, they always sound like the prettiest little cakes.

I was just talking about fairy cakes the other day with someone and how they remind me of my childhood and bake sales at school
.
They seemed to be the only cupcakes we knew or enjoyed making.

It's a shame nobody makes these anymore. The, cake, creams, cupcake, dessert, fairy cakes, magnolia bakery, mother's day, spring, strawberries, strawberry, summer, sweet, vanilla simplest things in life are always the best and no matter how simple this recipe may seem, you can't argue when something tastes this good! So I decided to make an adult friendly version of a fairy cake to please all.

These cakes are seriously delicious and a really cute play on strawberry shortcake. One bite of the fluffy and moist sponge topped with a sweet whipped cream filled with chopped strawberries and you'll be in heaven.

Happy Mother's Day!
Vanilla Cupcakes:
(makes 24)

  • 2 and 3/4 cups self-raising flour
  • 1 cup softened unsalted butter 
  • 2 cups sugar
  • 4 eggs 
  • 1 cup milk
  • 1 teaspoon vanilla extract
Cream filling: 
(for 24 cupcakes)
  • 1 cup heavy whipping cream
  • 1/4 cup confectioners sugar
  • 1/4 teaspoon vanilla extract
  • 1/2 cup chopped strawberries
  • confectioners sugar and strawberries for decorating.

Pre-heat oven to 350F. Line x2 12-cup muffin tins with paper cases.

In a large bowl, cream together the butter, sugar and vanilla extract with an electric whisk/mixer. Then add the eggs and whisk in well. Sift the flour into the bowl and fold the mixture together slowly pouring the milk until everything is combined well.

Spoon the mixture into each paper case about 3/4 full. Bake at 350F for 20-25 minutes.

Allow the cupcakes to cool completely on a wrap before you begin the next step.

In a large bowl whisk the heavy cream and vanilla until it reaches stiff peaks. Then add the confectioners sugar and chopped strawberries and whisk a little more until well combined.

Cut a circle out with a knife in the middle of each cupcake and then spoon the center out.

Fill the hole with a heaped dollop of whipped cream.


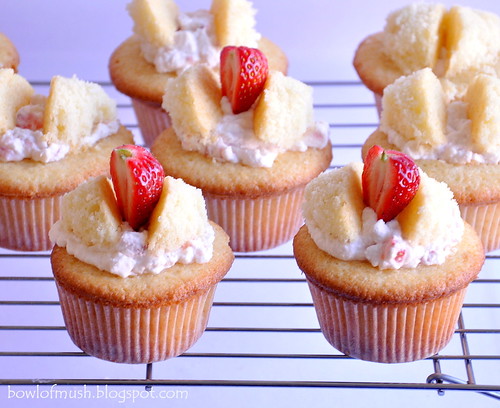
Cut the cut-out circle of cake in half and place as wings on top of the whipped cream with the rounder edges on the outside.

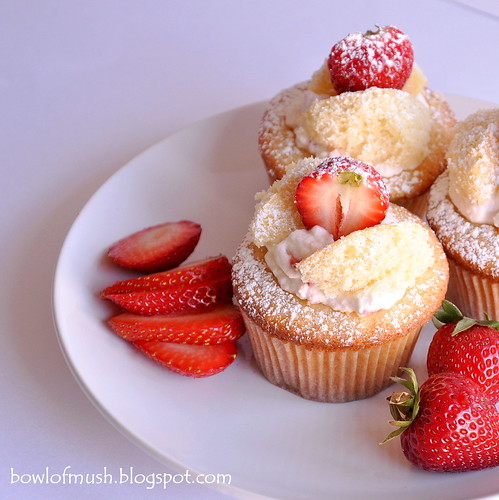
Repeat for all the cupcakes and then dust with confectioners sugar and add strawberries.

Thursday, April 22, 2010

LEMON-SYRUP TEA CAKE


If you are going to make any lemon cake, make this one! After countless lemon tea cakes, pound cakes, loafs etc, nothing beats this. One bite and you'll be daydreaming of the English countryside, sipping tea on a warm summer's day.It's the perfect afternoon cake; light, refreshing and vibrant with its sweet, lemony favor which is truly awoken by the syrup oozing through. It just melts in your mouth.

If you don't have self-rising cake flour like me, then substitute it for 3/4 cup + 2 1/3 tbsp all-purpose flour, 2 and 1/3 tbsp corn starch, 2 1/2 tsp baking powder and 1/4 tsp of salt.

It's going to be hard not to make this every week for the rest of the summer.
Lemon- Syrup Loaf Cake: (Adapted from How to Be a Domestic Goddess by Nigella Lawson
  • 1/2 cup unsalted butter
  • 1/2 cup + 1 tablespoon white sugar
  • 1/2 teaspoon vanilla extract (my addition to the recipe)
  • 2 large eggs
  • zest of 1 lemon
  • 1 cup + 1 tablespoon self-rising cake flour (substitute recipe above)
  • pinch of salt
  • 4 tablespoons milk
For the syrup:
  • Juice of 1 1/2 lemons (approx 4 tbsp)
  • 1/2 cup confectioners sugar

Preheat oven to 350F Butter and line the loaf pan with parchment paper.

Cream together the butter, sugar and vanilla extract. Add the eggs and lemon zest, beating them in well.

Sift in the flour and salt, folding in gently but well. Then add the milk and combine well.

Spoon the cake batter into the lined loaf pan and back at 350F for 45 minutes or until golden.

While the cake is baking, prepare the syrup. Add the lemon juice and confectioners sugar to a small saucepan and heat until the sugar dissolves completely. Set aside.

As as the cake is out of the oven, puncture all over the top of the cake with a tooth pick. Pour the lemon syrup all over the entire loaf.

Allow the cake to cool completely before taking it out of the loaf pan to avoid crumbling.


The cake is so moist, perfectly crumbly, light and beautifully lemony.


Serve with your favorite tea on a sunny afternoon :)


Sunday, April 4, 2010

EASTER THUMBPRINT COOKIES


Happy Easter! I love everything about this time of year: the beautiful spring weather, the colors, the produce, birds chirping in the morning, my birthday :) It's the one time in the year that I actually appreciate the color yellow; there's nothing like the friendliness of bright yellow daffodils.
Pastel colors are a must right now; it really cheers you up after all those winter blues. I always stock up on plenty of Cadbury's Mini Eggs come spring, not only do I love eating them, but they make the cutest decorations on cakes and cookies for Easter. I actually prefer the UK version of the Mini Eggs, they are more purple in color and have spots and specks on them just like birds eggs, but I couldn't get a hold of them.
We used to get so many huge Easter eggs when I was a kid from everyone, it was always a competition between us all to see who got the most. The supermarkets are absolutely filled with so many different Easter eggs this time of year in the UK.

These thumbprint cookies are very delicate and light like shortbread. They are very small, you get about two bites out of them, but they're the perfect Easter/spring treat, especially with the little mini egg on top. 
Easter Thumbprint Cookies
(makes 24)
  • 10 tablespoons unsalted butter
  • 1/2 cup confectioners sugar
  • 1/4 teaspoon salt
  • 1 teaspoon vanilla extract
  • 1 1/4 cups all-purpose flour
  • 4 ounces semi-sweet chocolate (chopped)
  • 1 tablespoons butter
Preheat the oven to 350 F.

With an electric mixer, beat together the butter, sugar, vanilla and salt until smooth. Beat in the flour slowly until the dough has formed.
Roll teaspoonfuls of dough into balls. Place on an un-greased baking sheet and bake for 10 mins.

Then remove from the oven and press thumb prints into the center of the balls (I used the end of a utensil).

Place the tray back in the oven for a further 7-9 minutes or until lightly golden.

Allow the cookies to cool fully on a rack.

Melt the chocolate and butter in a double boiler until smooth.

Allow to cool slightly, then pour the chocolate into the cookies little thumbprints.

Add a chocolate mini egg on top for a cute Easter look.

Wednesday, March 24, 2010

HEALTHY NO-BAKE GRANOLA BARS

When I'm not busy eating the things I love, like cakes and other treats, I actually try to eat pretty healthy. I try to at least do the obvious things, you know: eat lots of fruit and veggies, drink lots of water, force myself to exercise regularly...then treat myself to a cookie or 5 :) 

Lately, I've been on a bit of a cleanse. I decided that for one month, I would not have any dairy or wheat and only eat clean, alkaline and organic meals. I actually feel really great and have grown to love things like almond milk and green juices. I started buying those yummy health bars you always see in Whole Foods, like those Active Greens bars and Larabars (the coconut cream pie one is seriously amazing). That's when I thought, why am I not making these myself?

I've always loved granola bars; with all that butter and sugar that's usually in them, who wouldn't love them? So I attempted these unbaked, semi-raw health bars with no refined sugars or anything and they really turned out lovely! They are sticky and chewy with lot's of bite and nuttiness. These are some serious super powered bars that will give you a huge boost of energy and all the omega 3's you will ever need. I hope to make these more often, post cleanse.

Healthy No-Bake Granola Bars:
(makes 8-10 large slabs)
  • 3/4 cup rolled oats
  • 1/4 cup flax seeds
  • 1/4 cup chia seeds
  • 2 tbsp sesame seeds
  • 2 tbsp pumpkin seeds
  • 1/4 cup millet puffs
  • 3/4 cup unsweetened coconut flakes
  • 10 unsweetened medjool dates (pitted, chopped and mashed)
  • 1/3 cup raw almond butter
  • 1/4 cup organic, extra virgin coconut oil
  • 1/4 cup agave nectar

In a large bowl, add the oats, flax seeds, chia seeds, sesame seeds, pumpkin seeds, millet puffs and coconut flakes.

Then add the mashed dates, almond butter, agave nectar and coconut oil.

Scrunch the mixture with your hands until evenly and well combined. The mixture should easily stick together when you press it with your hands.


Line a baking dish or something similar with plastic wrap and then press the mixture into the dish firmly until even.

Cover tightly with more plastic wrap and then place the baking dish in the freezer for a few hours.

Remove slate of granola from the pan by flipping it upside down on a work surface, it should slip out easily because of the plastic wrap.


Cut the granola bars into slices and wrap each one individually in plastic wrap or wax paper and store in the refrigerator.

Saturday, February 13, 2010

ROSE PETAL CAKE


What cake doesn't look pretty and romantic with rose petals scattered on top?

This cake has certainly brought out the mushy side in me this Valentine's weekend and it's all thanks to that "slight" obsession I have with anything flavored or scented with rose.

Over the winter holidays I was in London and brought some amazing things back with me, including the cocoa powder from Ladurée which I broke into in my last post. Fortnum and Mason is a place that never goes unvisited any time I'm in London. It was all taken for granted when I lived there but now it's a struggle limiting what I wish to purchase to what my suitcase can handle.

Along with countless tins of tea, another item I did manage to squeeze back was a gorgeous rose petal jelly preserve made from fresh rose petals. I've been desperate to use it in something other than spreading it on toast at any chance I get.

The preserve works perfectly in this cake. Its genuine rose flavor and delicate scent is very reminiscent to a Ladurée rose macaroon...can't complain about that!

White Cake: 
(makes 2 cake layers)
  • 1 cup milk 
  • 6 egg whites
  • 1 tsp vanilla extract
  • 2 1/4 cups cake flour
  • 1 3/4 cup sugar
  • 2 teaspoons baking powder
  • Pinch of teaspoon salt
  • 3/4 cup softened butter
Buttercream:
  • 1 cup unsalted, softened butter (2 sticks)
  • 4-5 cups confectioners sugar
  • 1/2 cup milk
  • 1/2 teaspoon vanilla extract
  • 2-3 teaspoons rose syrup
  • Rose petal Jam (for spreading between cake layers)

Pre-heat oven to 350F.

Grease two 9 inch cake pans, line with parchment paper, grease again and dust with flour.

Combine the milk, egg whites and vanilla extract in a bowl, mix with a fork and set aside.

In another bowl, combine the flour, sugar, baking powder and salt. Mix together well (I sift mine a few times for a very light cake).

Add the butter and either with your hands or a paddle mixer combine the mixture until you have a crumb like texture.

Add all but 1/2 cup of the milk/egg mixture to the flour mixture and whisk on a medium speed for 1 1/2 minutes.

Add the remaining 1/2 cup of the milk/egg mixture and beat again for 30 seconds.


Divide the batter equally between the two cake pans and smooth the tops. Bake for 30-35 minutes at 350F.

Let the cakes cool in their pans for 15 minutes before moving them onto racks to cool fully.

For the buttercream, add the softened butter to a large bowl and whisk until smooth.

Then add the milk, vanilla extract and slowly add the confectioners sugar, whisking to create a smooth cream

Add the rose syrup and whisk again (This will color the cream pink).

To start assembling the cake, cut each 9 inch cake in half horizontally.

Spread the rose petal jelly on top of the first layer and spread a thin layer of the buttercream on top.

Spread the jelly on the bottom of the next cake piece, add this to the first cake piece and then spread the jelly on top, as well as the buttercream.

Repeat the same directions for the next two cake pieces.

Once the cake is assembled, begin to spread the butter-cream over the whole cake to cover it completely.


Sprinkle the cake with pink and red rose petals :)


Wednesday, February 3, 2010

Chocolate Love Muffins

Happy (almost) Valentine's Day!


Whether you're making these for your loved one, friends or just for yourself, they are sure to make anyone's Valentine's Day sweet.


I have actually made these muffins a few times without any Hallmark excuse, but adding the dusted heart on top gave it the cute factor for this holiday.


While I was in London over the Christmas holidays, I made it over to
Ladurée in Piccadilly for some of those macaroons I've been craving all year. I also picked up a beautiful box of their cocoa powder and I finally got to use it for the first time in this recipe. Good quality cocoa powder really does make a world of difference.


Chocolate Chocolate-Chip Muffins (makes 12)
(Adapted from Feast by Nigella Lawson)
  • 1 3/4 cups all-purpose flour
  • 2 teaspoons baking powder
  • 1/2 teaspoon baking soda
  • 2 tablespoons unsweetened cocoa powder
  • 1 large egg
  • 1 cup milk
  • 1/3 cup + 2 teaspoons vegetable oil (I used melted butter)
  • 3/4 cup sugar
  • 1 teaspoon vanilla extract
  • 3/4 cup semisweet chocolate chips

My lovely Ladurée cocoa!


Preheat the oven to 400F.

Measure out all the dry ingredients into a large bowl.

In another bowl measure out all the liquid ingredients.

Add the liquid to the dry ingredients and mix together.

Mix in the chocolate chips.


Line a 12 hole muffin tin with paper cups.

Spoon the muffin batter evenly into each paper cup.

Bake in the oven at 400F for 20 minutes.

Allow the muffins to cool on a rack.

To create the hearts on top of the muffins, place a heart shaped stencil on top of a muffin and lightly dust with powdered sugar. Remove the stencil carefully and repeat with each muffin.


Tuesday, December 22, 2009

Venetian Rainbow Cookies


Another Italian tradition from my fiancé's family and a definite favorite of mine. My mother-in-law to be is pretty much the master of these little cookies and makes them every Christmas.

The cookies have been given many different names such as Venetians, Italian rainbow cookies, seven layer cookies, etc. I've always known them as Venetians.


There are three almond cake layers in the cookies, which are tri-colored: green, white and red to represent the Italian flag, although the red tends to be more pinkish. In between each layer is a spread of raspberry jam. Some recipes call for apricot jam, but I'm sticking with my mother-in-law's recipe as it never fails to amaze. The topping of chocolate really finishes these little cookies off beautifully and when they're all cut into little squares, you are left with the most perfect Christmas cookies. One bite of these and you will be hooked forever!


  • 1 can (8 ounces) Almond paste (I make my own, see recipe below)
  • 1 & 1/2 cups butter (3 sticks) softened
  • 1 cup granulated sugar
  • 4 eggs, separated
  • 1 teaspoon almond extract
  • 2 cups sifted all-purpose flour
  • 1/4 teaspoon salt
  • 10 drops green food coloring
  • 8 drops red food coloring
  • 1 jar (12 ounces) red raspberry preserves (seedless)
  • 2 squares of semisweet chocolate or use semisweet chocolate chips
Almond Paste: 
(makes enough for 2 batches of cookies)
  • 1/2 cup orange juice
  • 2 cups blanched almonds
  • 1 cup sugar
To make the almond paste, grind the almonds until you have a fine almond flour, add all three ingredients to a blender and blend until combined well and smooth. Store in the refrigerator in an air-tight tub.

Grease three 13/9/2 " pans and line with waxed paper and grease again.

In large bowl add the almond paste, butter, sugar, egg yolks, and almond extract.

Beat until fluffy with an electric mixer for 5 minutes.


Beat in the flour and salt.

Beat the egg whites with an electric mixer until stiff peaks form in a small bowl. 

Stir the egg whites into the almond mixture with a folding motion.


Remove 1-1/2 cups of batter and spread into the first prepared pan.

Remove another 1-1/2 cups of batter, add green food coloring and spread into the second pan.

Add red food coloring to the remainder of the batter and spread into the third pan.


Bake at 350F for 15 minutes, or just until edges are golden brown.

The cakes should be 1/4 inch thick.

Cool on wire racks.


Place the green layer on the back of a foil covered cookie sheet.

Heat the raspberry preserves (strain if there is seeds) and spread 1/2 of the warm preserves on the green layer.

Slide on the yellow layer and spread the reminder of the preserves on top.

Slide on the red layer and cover with plastic wrap.

Store in the fridge overnight with a weight on top. (such as a cutting board)

Melt the chocolate and spread a thin layer over the top.


Allow to dry for 30 minutes and then cut into 1" square pieces.


Related Posts Plugin for WordPress, Blogger...