Monday, November 22, 2010

PUMPKIN WHOOPIE PIES


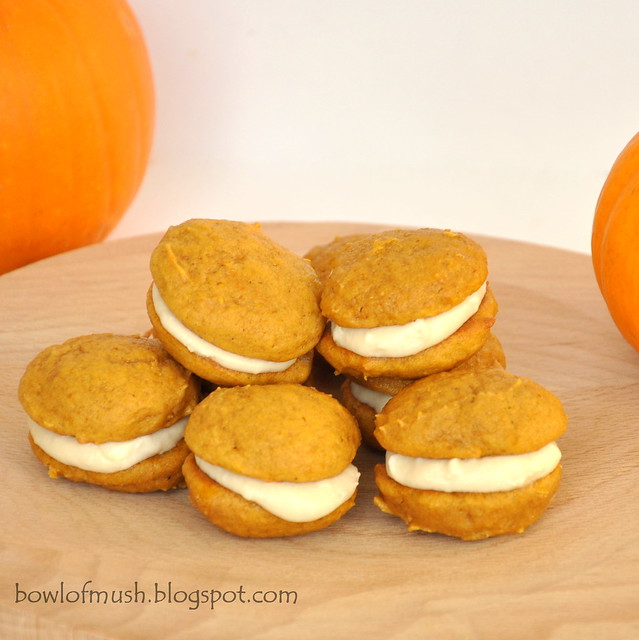
The first whoopie pies I ever made were red velvet last Christmas. What could be better than red velvet whoopie pies? Pumpkin ones! Everyone loves pumpkin this time of year. The maple cream cheese filling really completes the flavors of these delicate pumpkin delights. How could I resist not taking these to Thanksgiving this year?

I have only celebrated three Thanksgivings in my lifetime; being an American holiday, we don't celebrate it back home in the UK. Christmas is the only day we bring out the grand turkey, so it was a little disorientating for me the first time. It felt too much like Christmas. Thanksgiving definitely feels different to me now. The abundance of all things pumpkin is surely something that helps separate the holidays and sweet potatoes with marshmallows on top are not something you would find on the Christmas table. Thanksgiving has become an autumnal celebration of food that I just could not live without now.


Pumpkin Whoopie Pies:
(makes 36)

  • 3 cups all-purpose flour
  • 1 teaspoon baking powder
  • 1 teaspoon baking soda
  • 3/4 cup unsalted butter (softened)
  • 1 cup white sugar
  • 1/2 cup light brown sugar
  • 2 eggs
  • 1 and 1/2 cups pureed pumpkin
  • 1 teaspoon vanilla extract
  • 1 and 1/2 tablespoons ground cinnamon
  • 1 teaspoon ground ginger
  • 1/2 teaspoon ground nutmeg
  • 1/8th teaspoon ground cloves
  • 1/2 teaspoon salt
Maple Cream Cheese Filling:
  • 3 cups powdered sugar
  • 8 ounces cream cheese (room temp)
  • 5 tablespoons butter (softened)
  • 3 tablespoons maple syrup
  • 1 teaspoon vanilla extract
Preheat oven to 350F.

Cream together the butter and sugar well.


Whisk in the eggs, vanilla, salt and pumpkin.


Sift in the flour, baking powder, baking soda and spices.


Mix until well combined.


Scoop teaspoons of the batter on a parchment lined cookie sheet.


Bake for 10-15 minutes at 350F.


Allow to rest on a rack until completely cooled before assembling.


For the filling whisk all the ingredients together until very smooth.

Turn one cookie upside down and add a teaspoon of the frosting and add another cookie on top.


Continue until all your whoopie pies are assembled.


Friday, November 19, 2010

THE PERFECT CHOCOLATE CHIP COOKIE

As we near towards the holidays I often start to think about my favorite cookies. Everyone has their favorite Christmas cookies, but what's everyone's favorite cookie of all time? Is there really a cookie out there that is better than the classic chocolate chip cookie? For me there's just nothing I like more than a warm chocolate chip cookie fresh out the oven and dunked in a cup of tea.

Every person will always claim that their favorite chocolate chip cookie recipe is the best in the world. It all comes down to the fact that there actually is no such thing as the world's best chocolate chip cookie. Rather, it seems to come down to personal preference; the best chocolate chip cookie in ones own opinion. 

My mother in law makes what I would call the best chocolate chip cookies. She gave me this recipe years ago and I just haven't found another that turns out more perfect. Slightly crisp on the outside, soft and chewy on the inside with an overload of chocolate chips.

Chocolate Chip Cookies: 
(makes 24)
  • 2/3 cup butter (softened)
  • 1/2 cup granulated sugar
  • 1/2 cup brown sugar
  • 1 egg
  • 1 teaspoon vanilla extract (I added another teaspoon...)
  • 1 and 1/2 cups flour
  • 1/2 teaspoon baking soda
  • 1/2 teaspoon salt
  • 1 and 1/2 cup semisweet chocolate chips
Preheat oven to 375F.

Cream the butter and sugar together. mix in the egg and vanilla.


Sift in the flour, baking soda and salt.


Add the chocolate chips and combine well.


Scoop teaspoons of the cookie dough and spread out on a un-greased cookie sheet.


Bake at 375F for 8-10 minutes.


Remove when the cookies are still soft.

Monday, November 15, 2010

APPLE & CINNAMON MUFFINS


As soon as we enter fall, I always find myself at the farmers' market every Sunday without fail, even if there's nothing particular that I need. There's something very comforting about an Autumn farmers' market; it brings out the homely side in me.

Buying produce closest to their natural state seems more rustic and appropriate now that it's fall. Brussels sprouts: do I want to buy them loose and cut off from their stem? No, it's much more fun bringing the whole stalk home or a large bunch of carrots with their lengthy leaves still intact. I also find these vegetables being showcased more in the fall. The usual carrots chopped up and thrown in the microwave to steam rather become carrots braised in fresh thyme and beef stock or roasted along with a medley of other seasonal root vegetables such as butternut squash and parsnips with sage and butter.


Autumn seems to have that magic touch that transforms any of our everyday ruts to blissful comfort goodness. Oatmeal becomes spiced pumpkin oatmeal with maple syrup. Apple juice becomes warm apple cider with cinnamon. Our everyday coffee becomes a gingerbread or pumpkin latte and a blueberry muffin is now a warmly spiced apple muffin with almonds.

The best item of all to buy at the farmers' market this time of year is most certainly apples. We might eat them year round but never do they taste the same as freshly harvested fall apples. Honeycrisps are my favorite in particular; they're fantastically crunchy, sweet and juicy. I have used Honeycrisp apples in this muffin for a bite of luxurious sweetness, but any fresh Autumn apple will taste beautiful in these muffins to be truthful. My favorite muffin of the season...so far!

Apple and Cinnamon Muffins: Adapted from Nigella Lawson's Nigella Kitchen
(makes 12)

  • 2 of your favorite apples (peeled, cored and diced small)
  • 1 3/4 cups spelt flour or all-purpose flour (I used all-purpose)
  • 2 teaspoons baking powder
  • 1 teaspoon ground cinnamon
  • 2/3 cup light brown sugar
  • 1/2 cup honey
  • 1/4 cup plain yogurt
  • 1/2 cup flavorless vegetable oil (like canola)
  • 2 eggs
  • 1/4 cup raw almonds (roughly chopped)
For the topping:
  • 4 teaspoons light brown sugar
  • 1 teaspoon ground cinnamon
  • 1/4 cup raw almonds (roughly chopped)

Preheat oven to 400F.

Measure all the dry ingredients in bowl. Add the chopped almonds.


In another bowl add the brown sugar, honey, yogurt, oil and eggs.

Fold the dry ingredients into the wet along with the chopped apples. Don't over mix.

In a small bowl mix together the ingredients for the topping.

Spoon the batter into muffin cups/muffin tin and then sprinkle on top of each with the topping mixture.

Bake for 20 mins until risen and golden.


Wednesday, November 10, 2010

PUMPKIN, PECAN & CHOCOLATE CHIP MUFFINS


Happy Fall! I'm now Mrs. Bowl of Mush ;) Our wedding was everything I ever hoped it would be and the cake was SO delicious!

Now that I'm all settled down and there's no more crazy wedding plans to take care of I can finally get back to blogging! This is my favorite season for baking. It's a time for warm, comforting, Autumn flavors.


These muffins are so delicious and very fitting to the season. They smell incredible. Originally they started out as pumpkin pecan muffins but this time I added chocolate chips and I was in heaven.
Pumpkin, Pecan & Choc Chip Muffins:
(makes 12)

  • 2 cups flour
  • 1 1/2 tablespoons baking powder
  • 1/4 teaspoon baking soda
  • 1/4 teaspoon salt
  • 1 cup pumpkin puree
  • 1/2 cup vegetable oil (like canola)
  • 2 large eggs
  • 1/4 buttermilk
  • 1/2 cup sugar
  • 1/4 cup brown sugar
  • 1/2 teaspoon vanilla extract
  • 1/4 teaspoon ground nutmeg
  • 1/4 teaspoon ground ginger
  • 1/2 teaspoon ground cinnamon
  • pinch of ground cloves
  • 1/2 cup chopped pecans
  • 1/2 cup semi-sweet chocolate chips

Pre-heat oven to 350F.

Mix together the dry ingredients in a bowl. Set aside.

Mix together the wet ingredients and then add to the wet mixture.

Add the chopped pecans and chocolate chips.

Be careful not to over mix the batter for a lighter muffin.

Bake at 350F for 25-30 mins.

Thursday, July 1, 2010

PLUM CAKE

I watched Amelie last weekend; it's one of my favorite movies. I love escaping into Amelies magical, quirky world of cracking crème brûlées and skipping stones. There is a scene near the end where she begins to make a cake while day dreaming of her crush running in the rain outside, tracking down yeast for her "famous plum cake" and every time I see this I dream of eating plum cake in France. Well I'm not in France...but I did make a plum cake! Amelie made a Kouign-amann cake, which is quite a bit different to mine, there is no yeast in it, but it turned out to be a very moist and delicious plum cake.
Last week, the company Oh! Nuts sent some bags of nuts my way to use for recipes. Of course, I was delighted! They sent me some unshelled pistachios, macadamia nuts and almond flour. So I would like to say a big thank you to Oh! Nuts. I'm very keen to make some macadamia nut cookies and lots of things using the pistachios. I decided to begin with the almond flour for this plum cake and turn it into a plum and almond cake. The almond flour will also come in very handy when I finally attempt to make macarons!
Plum + Almond Cake:
(9" by 9" square pan)
  • 3-4 firm, sweet red plums (quartered and stone removed)
  • 3/4 cup butter (softened)
  • 1/2 cup + 2 tablespoons sugar
  • 3 eggs
  • 1 teaspoon almond extract
  • 1/2 teaspoon vanilla extract
  • 1 teaspoon orange zest
  • 1 cup almond flour
  • 1/2 cup all-purpose flour
  • 2 teaspoons baking powder
  • 1/4 tsp salt
  • pinch of nutmeg
  • 2 tablespoons milk

Pre-heat oven to 350F.

Cream the butter and sugar together, beating for about 3 mins.

Add the eggs, orange zest, almond extract and vanilla extract and beat well.

Then add the almond flour, all-purpose flour, baking powder and salt followed by the milk.


Combine well.

Pour the batter into a 9" by 9" square baking pan, or a 9" round pan if you prefer.

Arrange the plum quarters on top of the batter.

Bake at 350F for 30-40 mins until golden.

Allow to cool for at least 10 mins before serving. Sprinkle with powdered sugar.

Friday, June 25, 2010

CHERRY CLAFOUTIS

I can't believe how much work goes into planning a wedding!! Especially when you're having it back home in Scotland and you live in New York City! I thankfully have a fantastic family who are actually the real reason any of it is coming together...

Anyway, summer is finally here and I've got cherries on my mind. I love it when all the summer fruits are in season; raspberries, strawberries, mangoes, peaches and cherries are some I've been buying this month.

Before making this one, I had never had a cherry clafoutis or any other kind of clafoutis before, but I was always curious about it. My first testing of this recipe went horribly wrong and was more like an omelet but then after a lot of tweaking, I think I finally found the perfect cherry clafoutis. I don't have anything to compare it to, but it tasted amazing! I loved the custardy flan texture, the cherries were sweet and delicious and it had this lovely golden sponge covering it.

It has definitely become one of my favorite summer desserts. It's lovely warm out of the oven, or even cold. Makes a great brunch as well as a dessert!
Cherry Clafoutis:
  • 1 1/2 cups fresh cherries (pitted)
  • 3 eggs
  • 1/2 cup milk
  • 1/2 cup heavy cream
  • 1 teaspoon vanilla extract
  • pinch of nutmeg
  • 1/2 cup sugar
  • 2 tablespoons melted butter
  • 3/4 cup all-purpose flour

Pre-heat oven to 375F. Butter a 9" pie dish and set aside.

Pit the cherries. I just cut them in half and took the stone out. 

Whisk the eggs in a bowl for about 2 mins until they begin to turn pale. Add the cream, milk, vanilla, nutmeg, sugar and butter. Mix well.

Sift in the flour and mix until very smooth.
Pour the batter into the pie dish and then evenly spread out the cherries.

Bake for 30-40 mins until golden.

An inserted toothpick should come out clean and it should be firm inside.

Allow to sit out of the oven for 20 mins before serving.

Tuesday, May 4, 2010

LEMON POPPY-SEED COOKIES


Lemon plays an important role in almost everything I bake. It always adds that much needed kick in every recipe; including everyday savory meals (I know you are all surprised to hear that I don't actually eat cake for dinner...). A squeeze of lemon and a pinch of zest will liven up any dish.

Lemons are actually a really great way to alkalize and balance your body's natural PH, so it's always great adding it to your water, squeezing it in salad dressings or marinades, or of course, adding it to your cookies and cakes for a vitamin C boost. ;)

My favorite desserts always seem to be the lemony ones.
After making the lemon-syrup tea cake, my appetite for lemony treats will forever be incurable, but these cookies have thankfully kept me going.


If you're passionate for all things lemon, you will love these.
These cookies are perfectly sweet, crisp and delicate with a wonderful zesty tang. The poppy seeds add a lovely crunch and finish off the cookie very well.


This dough is a lot wetter than most cookie dough. I think it may help to refrigerate the dough for a couple of hours before rolling into balls. I didn't do that, I just worked gently with it using a cookie scoop and dropping the dough in the sugar mix and gently rolling it around.
Lemon Poppy-Seed Cookies: (adapted from Martha Stewart Living, August 2004)
(Makes approx 30)
  • 1/4 cup fresh lemon juice
  • 3 1/2 teaspoons lemon zest
  • 1 cup unsalted butter (2 sticks)
  • 2 cups all-purpose flour
  • 1 teaspoon baking powder
  • 1/2 teaspoon salt
  • 1 1/2 cups sugar
  • 1 large egg
  • 2 teaspoons vanilla extract
  • 1 tablespoon poppy seeds (plus extra for sprinkling)

Pre-heat oven to 375F. Bring the lemon juice to a simmer in a saucepan until reduced by half. Add 1/2 cup (1 stick) of butter, stir until melted. Set aside.


In a large bowl, cream together the other 1/2 cup (stick) of butter with 1 cup of the sugar with an electric mixer. Add the egg and melted lemon butter. Whisk for about 3 minutes until it becomes pale. Mix in the vanilla and 2 teaspoons of the lemon zest.

Sift in the flour, baking powder and salt, fold gently and then add the poppy seeds.


In another bowl, stir together the remaining sugar and lemon zest. Take spoonfuls of the cookie dough and roll it in the sugar/zest mix. Place 2 inches apart on a parchment lined baking sheet. Press each cookie flat with the flat side of a glass dipped in the sugar/zest mix. Sprinkle with more poppy seeds.


Bake in the oven for 10-11 minutes at 375F until the bottoms have browned lightly.
Allow to cool fully on a rack.


Check out some of my other Lemony Posts:
Lemon Cream Cake
Lemon Tarts
Lemon-syrup Tea Cake

Friday, April 30, 2010

STRAWBERRIES & CREAM FAIRY CAKES


I always called these fairy cakes, but recently discovered that most people call them butterfly cakes. Either way, they always sound like the prettiest little cakes.

I was just talking about fairy cakes the other day with someone and how they remind me of my childhood and bake sales at school
.
They seemed to be the only cupcakes we knew or enjoyed making.

It's a shame nobody makes these anymore. The, cake, creams, cupcake, dessert, fairy cakes, magnolia bakery, mother's day, spring, strawberries, strawberry, summer, sweet, vanilla simplest things in life are always the best and no matter how simple this recipe may seem, you can't argue when something tastes this good! So I decided to make an adult friendly version of a fairy cake to please all.

These cakes are seriously delicious and a really cute play on strawberry shortcake. One bite of the fluffy and moist sponge topped with a sweet whipped cream filled with chopped strawberries and you'll be in heaven.

Happy Mother's Day!
Vanilla Cupcakes:
(makes 24)

  • 2 and 3/4 cups self-raising flour
  • 1 cup softened unsalted butter 
  • 2 cups sugar
  • 4 eggs 
  • 1 cup milk
  • 1 teaspoon vanilla extract
Cream filling: 
(for 24 cupcakes)
  • 1 cup heavy whipping cream
  • 1/4 cup confectioners sugar
  • 1/4 teaspoon vanilla extract
  • 1/2 cup chopped strawberries
  • confectioners sugar and strawberries for decorating.

Pre-heat oven to 350F. Line x2 12-cup muffin tins with paper cases.

In a large bowl, cream together the butter, sugar and vanilla extract with an electric whisk/mixer. Then add the eggs and whisk in well. Sift the flour into the bowl and fold the mixture together slowly pouring the milk until everything is combined well.

Spoon the mixture into each paper case about 3/4 full. Bake at 350F for 20-25 minutes.

Allow the cupcakes to cool completely on a wrap before you begin the next step.

In a large bowl whisk the heavy cream and vanilla until it reaches stiff peaks. Then add the confectioners sugar and chopped strawberries and whisk a little more until well combined.

Cut a circle out with a knife in the middle of each cupcake and then spoon the center out.

Fill the hole with a heaped dollop of whipped cream.


Cut the cut-out circle of cake in half and place as wings on top of the whipped cream with the rounder edges on the outside.

Repeat for all the cupcakes and then dust with confectioners sugar and add strawberries.

Thursday, April 22, 2010

LEMON-SYRUP TEA CAKE


If you are going to make any lemon cake, make this one! After countless lemon tea cakes, pound cakes, loafs etc, nothing beats this. One bite and you'll be daydreaming of the English countryside, sipping tea on a warm summer's day.It's the perfect afternoon cake; light, refreshing and vibrant with its sweet, lemony favor which is truly awoken by the syrup oozing through. It just melts in your mouth.

If you don't have self-rising cake flour like me, then substitute it for 3/4 cup + 2 1/3 tbsp all-purpose flour, 2 and 1/3 tbsp corn starch, 2 1/2 tsp baking powder and 1/4 tsp of salt.

It's going to be hard not to make this every week for the rest of the summer.
Lemon- Syrup Loaf Cake: (Adapted from How to Be a Domestic Goddess by Nigella Lawson
  • 1/2 cup unsalted butter
  • 1/2 cup + 1 tablespoon white sugar
  • 1/2 teaspoon vanilla extract (my addition to the recipe)
  • 2 large eggs
  • zest of 1 lemon
  • 1 cup + 1 tablespoon self-rising cake flour (substitute recipe above)
  • pinch of salt
  • 4 tablespoons milk
For the syrup:
  • Juice of 1 1/2 lemons (approx 4 tbsp)
  • 1/2 cup confectioners sugar

Preheat oven to 350F Butter and line the loaf pan with parchment paper.

Cream together the butter, sugar and vanilla extract. Add the eggs and lemon zest, beating them in well.

Sift in the flour and salt, folding in gently but well. Then add the milk and combine well.

Spoon the cake batter into the lined loaf pan and back at 350F for 45 minutes or until golden.

While the cake is baking, prepare the syrup. Add the lemon juice and confectioners sugar to a small saucepan and heat until the sugar dissolves completely. Set aside.

As as the cake is out of the oven, puncture all over the top of the cake with a tooth pick. Pour the lemon syrup all over the entire loaf.

Allow the cake to cool completely before taking it out of the loaf pan to avoid crumbling.


The cake is so moist, perfectly crumbly, light and beautifully lemony.


Serve with your favorite tea on a sunny afternoon :)


Sunday, April 4, 2010

EASTER THUMBPRINT COOKIES


Happy Easter! I love everything about this time of year: the beautiful spring weather, the colors, the produce, birds chirping in the morning, my birthday :) It's the one time in the year that I actually appreciate the color yellow; there's nothing like the friendliness of bright yellow daffodils.
Pastel colors are a must right now; it really cheers you up after all those winter blues. I always stock up on plenty of Cadbury's Mini Eggs come spring, not only do I love eating them, but they make the cutest decorations on cakes and cookies for Easter. I actually prefer the UK version of the Mini Eggs, they are more purple in color and have spots and specks on them just like birds eggs, but I couldn't get a hold of them.
We used to get so many huge Easter eggs when I was a kid from everyone, it was always a competition between us all to see who got the most. The supermarkets are absolutely filled with so many different Easter eggs this time of year in the UK.

These thumbprint cookies are very delicate and light like shortbread. They are very small, you get about two bites out of them, but they're the perfect Easter/spring treat, especially with the little mini egg on top. 
Easter Thumbprint Cookies
(makes 24)
  • 10 tablespoons unsalted butter
  • 1/2 cup confectioners sugar
  • 1/4 teaspoon salt
  • 1 teaspoon vanilla extract
  • 1 1/4 cups all-purpose flour
  • 4 ounces semi-sweet chocolate (chopped)
  • 1 tablespoons butter
Preheat the oven to 350 F.

With an electric mixer, beat together the butter, sugar, vanilla and salt until smooth. Beat in the flour slowly until the dough has formed.
Roll teaspoonfuls of dough into balls. Place on an un-greased baking sheet and bake for 10 mins.

Then remove from the oven and press thumb prints into the center of the balls (I used the end of a utensil).

Place the tray back in the oven for a further 7-9 minutes or until lightly golden.

Allow the cookies to cool fully on a rack.

Melt the chocolate and butter in a double boiler until smooth.

Allow to cool slightly, then pour the chocolate into the cookies little thumbprints.

Add a chocolate mini egg on top for a cute Easter look.

Wednesday, March 24, 2010

HEALTHY NO-BAKE GRANOLA BARS

When I'm not busy eating the things I love, like cakes and other treats, I actually try to eat pretty healthy. I try to at least do the obvious things, you know: eat lots of fruit and veggies, drink lots of water, force myself to exercise regularly...then treat myself to a cookie or 5 :) 

Lately, I've been on a bit of a cleanse. I decided that for one month, I would not have any dairy or wheat and only eat clean, alkaline and organic meals. I actually feel really great and have grown to love things like almond milk and green juices. I started buying those yummy health bars you always see in Whole Foods, like those Active Greens bars and Larabars (the coconut cream pie one is seriously amazing). That's when I thought, why am I not making these myself?

I've always loved granola bars; with all that butter and sugar that's usually in them, who wouldn't love them? So I attempted these unbaked, semi-raw health bars with no refined sugars or anything and they really turned out lovely! They are sticky and chewy with lot's of bite and nuttiness. These are some serious super powered bars that will give you a huge boost of energy and all the omega 3's you will ever need. I hope to make these more often, post cleanse.

Healthy No-Bake Granola Bars:
(makes 8-10 large slabs)
  • 3/4 cup rolled oats
  • 1/4 cup flax seeds
  • 1/4 cup chia seeds
  • 2 tbsp sesame seeds
  • 2 tbsp pumpkin seeds
  • 1/4 cup millet puffs
  • 3/4 cup unsweetened coconut flakes
  • 10 unsweetened medjool dates (pitted, chopped and mashed)
  • 1/3 cup raw almond butter
  • 1/4 cup organic, extra virgin coconut oil
  • 1/4 cup agave nectar

In a large bowl, add the oats, flax seeds, chia seeds, sesame seeds, pumpkin seeds, millet puffs and coconut flakes.

Then add the mashed dates, almond butter, agave nectar and coconut oil.

Scrunch the mixture with your hands until evenly and well combined. The mixture should easily stick together when you press it with your hands.


Line a baking dish or something similar with plastic wrap and then press the mixture into the dish firmly until even.

Cover tightly with more plastic wrap and then place the baking dish in the freezer for a few hours.

Remove slate of granola from the pan by flipping it upside down on a work surface, it should slip out easily because of the plastic wrap.


Cut the granola bars into slices and wrap each one individually in plastic wrap or wax paper and store in the refrigerator.
Related Posts Plugin for WordPress, Blogger...