Tuesday, December 22, 2009

Venetian Rainbow Cookies


Another Italian tradition from my fiancé's family and a definite favorite of mine. My mother-in-law to be is pretty much the master of these little cookies and makes them every Christmas.

The cookies have been given many different names such as Venetians, Italian rainbow cookies, seven layer cookies, etc. I've always known them as Venetians.


There are three almond cake layers in the cookies, which are tri-colored: green, white and red to represent the Italian flag, although the red tends to be more pinkish. In between each layer is a spread of raspberry jam. Some recipes call for apricot jam, but I'm sticking with my mother-in-law's recipe as it never fails to amaze. The topping of chocolate really finishes these little cookies off beautifully and when they're all cut into little squares, you are left with the most perfect Christmas cookies. One bite of these and you will be hooked forever!


  • 1 can (8 ounces) Almond paste (I make my own, see recipe below)
  • 1 & 1/2 cups butter (3 sticks) softened
  • 1 cup granulated sugar
  • 4 eggs, separated
  • 1 teaspoon almond extract
  • 2 cups sifted all-purpose flour
  • 1/4 teaspoon salt
  • 10 drops green food coloring
  • 8 drops red food coloring
  • 1 jar (12 ounces) red raspberry preserves (seedless)
  • 2 squares of semisweet chocolate or use semisweet chocolate chips
Almond Paste: 
(makes enough for 2 batches of cookies)
  • 1/2 cup orange juice
  • 2 cups blanched almonds
  • 1 cup sugar
To make the almond paste, grind the almonds until you have a fine almond flour, add all three ingredients to a blender and blend until combined well and smooth. Store in the refrigerator in an air-tight tub.

Grease three 13/9/2 " pans and line with waxed paper and grease again.

In large bowl add the almond paste, butter, sugar, egg yolks, and almond extract.

Beat until fluffy with an electric mixer for 5 minutes.


Beat in the flour and salt.

Beat the egg whites with an electric mixer until stiff peaks form in a small bowl. 

Stir the egg whites into the almond mixture with a folding motion.


Remove 1-1/2 cups of batter and spread into the first prepared pan.

Remove another 1-1/2 cups of batter, add green food coloring and spread into the second pan.

Add red food coloring to the remainder of the batter and spread into the third pan.


Bake at 350F for 15 minutes, or just until edges are golden brown.

The cakes should be 1/4 inch thick.

Cool on wire racks.


Place the green layer on the back of a foil covered cookie sheet.

Heat the raspberry preserves (strain if there is seeds) and spread 1/2 of the warm preserves on the green layer.

Slide on the yellow layer and spread the reminder of the preserves on top.

Slide on the red layer and cover with plastic wrap.

Store in the fridge overnight with a weight on top. (such as a cutting board)

Melt the chocolate and spread a thin layer over the top.


Allow to dry for 30 minutes and then cut into 1" square pieces.


Italian Anise Cookies


Merry Christmas everyone!

For the past five years I've had these cookies at my fiancé's family Christmas. It is an Italian tradition that has been in their family for years and they are truly fantastic.


This Christmas, as we will be at my family's place, I thought it would be lovely to make them. My family Christmases are usually very British: Christmas puddings, mince pies, etc.

These Italian cookies have a subtle yet soft anise flavor complimented by the sweetness of vanilla. They really do brighten up a Christmas or New Year dessert spread and are a perfect treat with coffee after a wonderful dinner. The cookies came out much bigger than I wanted them to be in my first batch. Unless you want them to be big cookies, make sure you roll them into little balls, no bigger than the size of a walnut.

I've made a huge batch of these for the holidays!

Italian Anise Cookies: (a family recipe)
(makes about 30 cookies)

  • 1 cup sugar
  • 3 eggs
  • 2 teaspoons vanilla extract
  • 3 cups flour
  • 3/4 Cup Butter or shortening
  • 4 teaspoons baking powder
  • Pinch salt
  • 1-3 tablespoons milk
  • 1 1/2 teaspoon anise extract

Cream the butter and sugar together until fluffy.


Add eggs one at a time and whisk.

Add the vanilla extract and anise extract.

Sift in the flour and baking powder.

Add a little milk at a time until you have a smooth dough.


Roll the dough into walnut sized balls and place on a a baking sheet lined with parchment paper.


Bake in a pre-heated oven at 375F for 12-15 minutes. Do not let them brown.


Allow to cool on a rack.


Ice the cookies by mixing powdered sugar and milk together until quite thick and add 1\2 teaspoon vanilla extract and 1 teaspoon anise extract.


Drizzle over the cooled cookies and sprinkle with colored balls.


Thursday, December 17, 2009

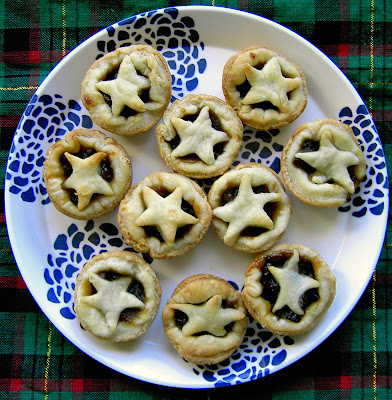
Mini Star-Topped Mince Pies


This is truly the most traditional food of the British Christmas season. We all know Christmas is upon us when mince pies are being stocked in every store around.

You really can buy the most perfectly delicious mince pies, there are so many different brands, but you absolutely cannot beat warm mince pies fresh out of the oven. The buttery sweet, slightly spicy and fruity aroma it leaves around your house is honestly the best thing about Christmas.

These festive pies have always been a tradition in my life; Christmas Eve wouldn't be right without a beautifully lit tree, a fun holiday movie and a tray of mince pies to share. As a child a mince pie and a glass of milk were always left out on Christmas Eve for Santa Claus.


These Mini Mince Pies have become my very favorite. They're bite size and can easily be popped in your mouth in one go. The more you eat the merrier!


I did not make my own mincemeat, If you buy a really good jar of mincemeat you aren't really missing out on anything. Of course many prefer to make their own but with the absolute stress and rush in this holiday season, its always nice to come home and know that freshly baked mince pies are just minutes away (make lots of pie dough ahead of time and refrigerate or freeze like I do).


Star-topped Mince Pies: (Adapted from Nigella Christmas by Nigella Lawson)
(Makes 36)

  • 1-2/3 cups all-purpose flour
  • 5 tablespoons vegetable shortening, such as Crisco
  • ½ stick (4 tablespoons) cold butter
  • Juice of 1 orange
  • Pinch of salt
  • Approximately 2/3 cup mincemeat
You will need a mini-muffin pan, a 2¼ inch round cookie cutter and a 1¾ inch star cookie cutter.

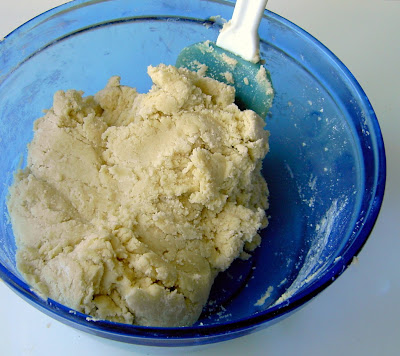
To make the pie dough, measure out the flour in a bowl, add the butter and shortening and rub the fat and flour between your fingers until you are left with crumbs (or pulse in a food processor).

Add the orange juice to this as well as the salt and combine together.

Turn the dough out on a floured surface and knead it together well.

Cut the dough into about 3 batches, cover each with cling film and refrigerate for 20 minutes.

Pre-heat the oven to 425F.

Take out each batch and roll each into discs and cut out circles and stars per mold.

Press the circles gently into the molds of the mini muffin tins.

Add about a teaspoon of mince meat mixture into each mold and then top it with a star.

Bake in the oven for 10-15 minutes at 425F until golden and bubbling.

Allow the pies to cool on a wire rack, although they are just perfect straight out of the oven.


Friday, December 4, 2009

Red Velvet Whoopie Pies


Happy Holidays!
The tree is up and I'm playing annoyingly great jingly tunes. So what's next? Time to get into some serious Christmas baking. I'm still eating cranberry bread, its so nice this time of year and I'm hoping to squeeze in a lot of other festive treats on here before I fly to Edinburgh for Christmas.

I've pretty much been waiting all year to make these and I couldn't wait any longer! These little cakes just scream Christmas, they're so festive.

The cake is extremely moist and tender with a subtle cocoa flavor and the vanilla filling is very creamy and delicious. I know the majority of whoopie pies either have a cream cheese or marshmallow filling but this frosting definitely plays its part as a perfect creamy center.

Red Velvet Whoopie Pies:
(makes 15 whoopie pies)
  • 1/2 cup light brown sugar
  • 1/4 cup softened butter
  • 1/2 teaspoon vanilla extract
  • 1 egg
  • 1/2 cup buttermilk
  • 1 cup all-purpose flour
  • 1 1/2 tablespoons cocoa powder (unsweetened)
  • 1/2 teaspoon baking soda
  • 1/8th teaspoon salt
  • 2-3 teaspoons red food coloring
Filling:
(makes 1 cup)
  • 1/4 cup softened butter
  • 2 cups confectioners sugar
  • 1/4 cup milk
  • 1 teaspoon vanilla extract
  • pinch salt

Pre-heat oven to 375F and line a baking tray with parchment paper.

In a large bowl cream together the butter, sugar and vanilla extract.

Whisk in the egg and salt until smooth and then mix in the buttermilk.

Sift in the flour, cocoa powder and baking soda.

Then add the red food coloring and mix to combine evenly.


Evenly scoop out teaspoons of the mixture on to the lined baking tray separating each at least an inch apart (for 2 inch whoopie pies).

Bake in the middle of the oven at 375F for 7-9 minutes (you will have to do this in batches).

Allow the little cakes to cool on a rack.


To make the filling, whisk together the butter, milk, vanilla and salt then slowly add the confectioners sugar while whisking until you have a smooth frosting.

Place a heaped teaspoon of the filling on the underside of 1/2 the cake circles and place the other 1/2 of the cakes on top to sandwich.


Monday, November 23, 2009

Pecan Pie


Pecan pie is such a classic dessert that is usually so poorly made these days. It is a humble pie with very simple flavors and when you have simplicity like this, it is important for the quality of the ingredients to be really good, allowing the wonderful flavors in this delicious pie to come through.

I've noticed that a lot of pecan pies are made using corn syrup, which I really don't like. I don't think it does anything to help the beautiful flavors or aromas that a pecan pie should have and you are left with something quite sickly.
Maple pecan pies can be really good and I would always choose maple syrup over corn syrup of course. I didn't want to use maple for this pie as I was aiming for a great classic pecan pie.

There are a few twists in this recipe, I did everything I could to achieve a classically tasting pecan pie using good ingredients.
It's not too horribly sweet or overwhelming allowing the pecans to dominate the flavors.

I really loved the way the pie filling came out, it was exactly what I was hoping for. Not too horribly sweet or overwhelming. You can pick out a lot of the individual flavors in each bite along with the lovely pecan flavors. This pie just melts in your mouth.


Happy Thanksgiving!
:)

Pecan Pie:

Makes one 9" pie


  • 1 cup halved pecans
  • 3 tablespoons butter (softened)
  • 1/2 cup brown sugar
  • 1/4 cup + 2 tablespoons golden syrup
  • 2 teaspoons molasses
  • 1 teaspoon vanilla extract (good quality)
  • 3 large eggs
  • 1/4 teaspoon orange zest
  • 1/4 cup + 1 tablespoon whole milk
  • 2 tablespoons all-purpose flour
  • 1 teaspoon finely grated dark chocolate ( I used Valrhona 85%)
  • 1/4 teaspoon salt
  • pinch of nutmeg
  • pinch of cinnamon


Pre-heat the oven to 350F


Toast the pecan half's on a baking sheet for 7 minutes


Set aside to cool


Set the oven to 400F.

In a large bowl cream together the butter and brown sugar.

Add the golden syrup, molasses and vanilla extract and begin to whisk.

Whisk in the eggs and milk.

Then add the orange zest, grated chocolate, nutmeg, cinnamon, salt and all-purpose flour.

Whisk very well to combine and then add the toasted pecans.


Pour the mixture into the par-baked pie crust.

Bake in the oven at 400F for 5 minutes then turn it down to 325F and bake for 45-50 minutes.

The pie should still jiggle slightly but a knife should come out clean when pierced.


Tuesday, November 17, 2009

Chocolate Walnut Biscotti


The plan for this week's post was to make traditional Italian biscotti, but after finding that I had no anise flavoring, I decided to make chocolate biscotti and make the traditional one another time. 

I always thought that the best chocolate biscotti I ever had was the one from Meredith's Bread at the NY farmers' markets, but while their biscotti is still fantastic, I really do think this Amy's Bread recipe beats it.

The recipe Is actually chocolate and hazelnut, and I know I have a habit of replacing hazelnuts in a lot of things. It's not that I hate them, I'm just not a huge fan of them and would always prefer walnuts or almonds, especially in biscotti. 

I'm just going to go ahead and say that I think it's pretty much impossible to get a better chocolate biscotti than this. I'm amazed at the perfection of this recipe.

These indulgent biscotti have just the right amount of sweetness and are beautifully studded with bits of chocolate and nuts. They would be a perfect accompaniment to the end of a Christmas or Thanksgiving meal with coffee as they are not overwhelmingly rich but hit the spot when in need of something sweet and chocolatey.

Chocolate Walnut Biscotti: (makes 24)
Adapted from The Sweeter Side of Amy's Bread. (Recipe for Chocolate Hazelnut Biscotti)

  • 2 tablespoons unsalted butter (softened)
  • 1 cup + 1 tablespoon sugar
  • 2 large eggs
  • 1/2 teaspoon vanilla extract
  • 1 cup + 2 tablespoons all-purpose flour
  • 1/2 cup + 2 teaspoons unsweetened cocoa powder (use a really good one)
  • 1 teaspoon instant coffee powder
  • 1 teaspoon baking soda
  • 1/4 teaspoon cinnamon
  • 1 3/4 cups hazelnuts, toasted (I substituted these for Walnuts)
  • 3/4 cup semisweet chocolate chips
  • 1 large egg for egg wash

Pre-heat oven to 350F and line a large baking sheet with parchment paper.

In a large bowl, cream together the butter and sugar using an electric whisk.

Add the eggs and vanilla and whisk until fluffy and pale (1 min).

Sift in the flour, cocoa powder, coffee powder, baking soda and cinnamon. Fold this in to combine.

Then fold in the toasted nuts and chocolate chips.

Divide the dough in half and turn each one out onto a floured surface and roll each half into a log and patting down slightly to form the dough to approximately 2 inches wide by 14 inches long by 1 1/2 inches high.

Place each log on to the prepared baking sheet several inches apart.

In a small bowl mix an egg and then brush the egg wash lightly over the top of the logs.

Bake in the middle of the oven for 27 minutes, rotating the baking sheet half way through.

Remove from the oven and turn the oven down to 300F.

Allow the logs to cool for about 20 minutes before slicing them at an angle to about 3/4-inch-thick pieces.

Lay each slice back on a baking sheet lined with parchment paper leaving at least 1/2 inch of space between each.

Bake them at 300F for 5 minutes and then flip each biscotti piece over and bake on the other side for 5 minutes again.

Remove them from the oven and allow to cool fully.


Related Posts Plugin for WordPress, Blogger...